Star Trek “Starships Collection:” USS Pegasus NCC-53847 (XL) by Eaglemoss

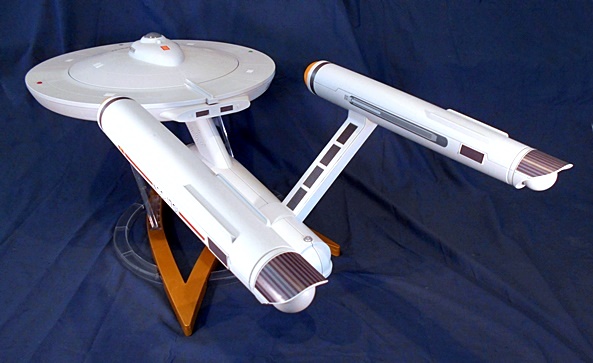
I was hoping to get back and wrap up a wave of Marvel Legends this week, but I’ve been a little pressed for time and so instead I decided to dig into one of the many Eaglemoss ships I picked up during the crazy sale they’ve been running and snap some pictures. So, let’s check out another of the big boys, and have a chat about the XL model of the USS Pegasus!

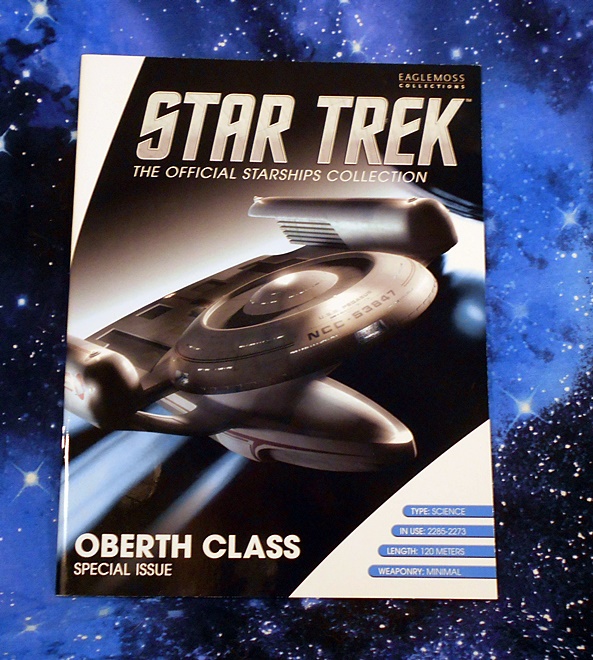
I confess, I mostly love reviewing these models because it gives me a chance to talk about Trek Starships! We were first introduced to the Oberth Class vessel in Star Trek III, when the poor USS Grissom got absolutely savaged by a Klingon Bird of Prey and taken out with a single torpedo. The Oberth would later pop up from time to time in The Next Generation. It was even featured in the very first regular episode when the Enterprise encountered the USS Tsiolkovsky in The Naked Now. But today’s model, The Pegasus, was the titular ship in a Season 7 story involving a top secret experiment to mate a cloaking device with a Federation Starship. And yeah, it didn’t go well. The ship comes in a fully enclosed box and includes a beautiful glossy magazine with some info about the ship and the episode. The model itself comes fully assembled, you just need to set up the stand and you’re good to go!

The Oberth Class is certainly an atypical design for Starfleet, but I must have watched the Grissom get blown up a hundred times over and so I consider this design rather iconic and instantly familiar. And boy is this an absolutely beautiful model of the ship. As usual, you’re getting a combination of plastic and diecast, with most of the diecast here being in the Primary Hull. It gives the model a very satisfying heft and the diecast parts blend quite well with the plastic bits. The paint is gorgeous, and I am particularly impressed by the aztec pattern on the hull, which is conveyed in a few different shades and really makes the ship look like it’s comprised of hundreds of smaller plates. Everything about the hull coloring just screams quality here!

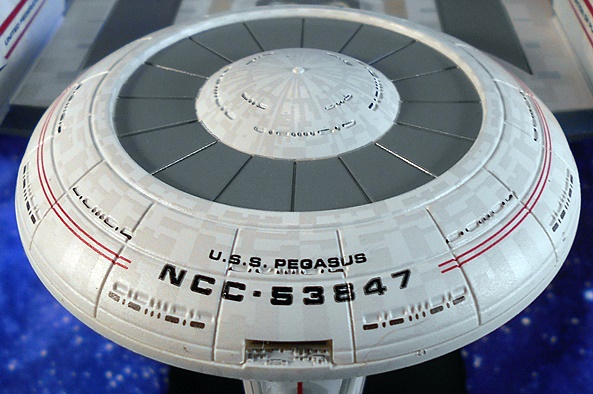
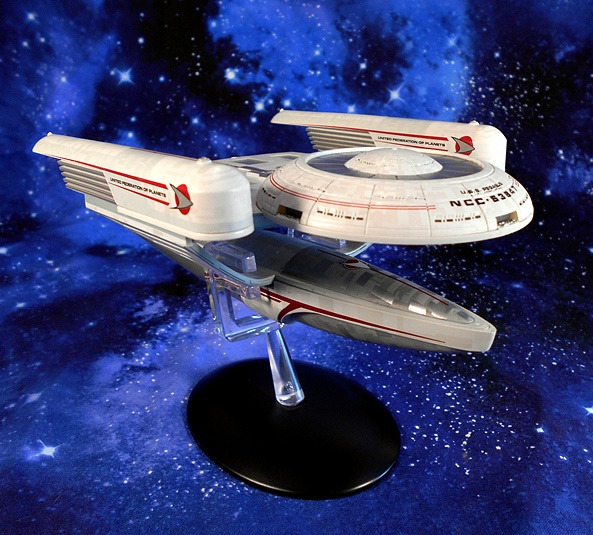
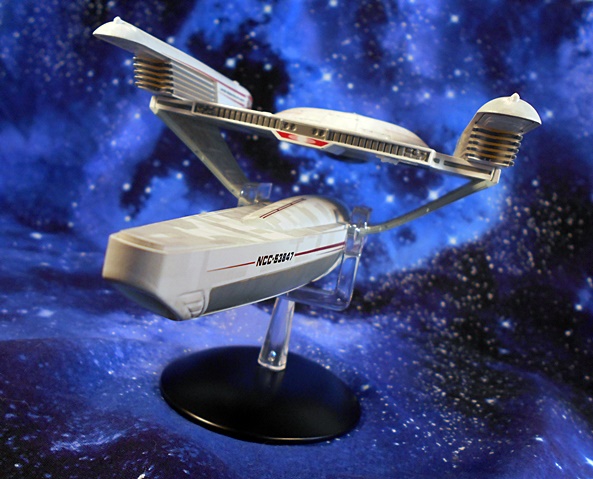
Of course, the Pegasus still has a saucer of sorts, it’s just smaller and integrated into a shelf that connects the two warp nacelles. You get some pretty crisp printing on the front declaring the ship’s name and registry number, as well as some red pinstriping on the outer arcs of the saucer. I can’t really talk a lot about the particulars of this ship design, because I’ve never had a proper look at the schematics. It’s a controversial design, as it often had fans speculating how crewmembers traveled between the Primary and Secondary Hulls without the traditional neck connecting them. Did they beam across? I’m sure the explanation consists of some kind of Turbolift shaft running through the nacelle supports, but it’s fun to wonder about it.

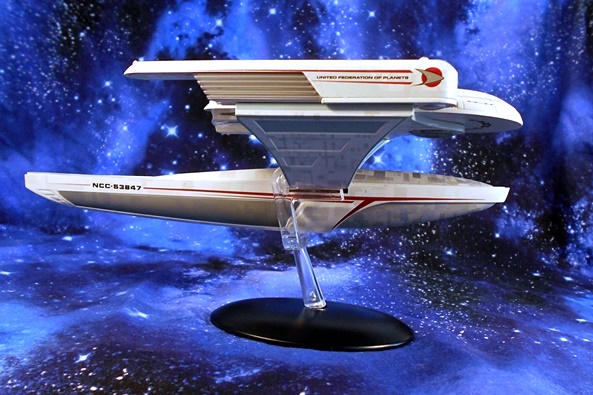
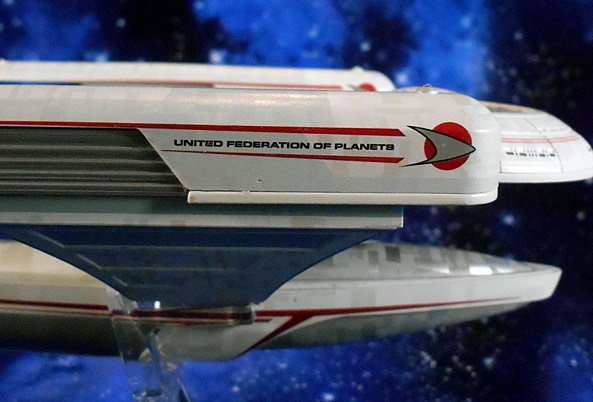
I became pretty familiar with this ship through the FASA tabletop game, and I’m pretty sure it was among the miniatures I had when I was younger. The registry is printed towards the back of the ship’s tail-like Secondary Hull, along with more of that beautiful red pin-striping. The Starfleet Delta is printed on the sides of the warp nacelles, with United Federation of Planets. I really dig the atypical stylings of the warp nacelle’s here, which are rather stubby and feature a grill-like structure that doesn’t conform to what we’re used to seeing on the Motion Picture ship designs, or really anything since. The stand here is quite effective, as it grabs the ship from behind the two nacelle pylons. The connection is rock solid and the clear support allows it to hold the ship without obscuring any details.

If you aren’t familiar with the XL ships, they are quite large, but do not conform to any relative scale. As a result, the roughly 9-inch long XL Pegasus looks massive when displayed next to the XL Refit Enterprise or Excelsior. Here are some shots of her next to the regular sized USS Grissom model, which not only show the size difference, but some of the subtle variances between the Grissom and Pegasus designs.

I love this design, and it’s nice to see the Oberth Class get the XL treatment, even if it is best displayed alone, so as not to dwarf the ships that are supposed to be much bigger. Of course, you have to be pretty dedicated to add this ship to your collection at the full retail price of $79.99. I’m not saying it isn’t worth it, as it’s a substantial model with some absolutely striking attention to detail, but it’s still a lot of gold pressed latinum to put a one-off Starship on your desk. Luckily, it’s been going up as part of the big sales Eaglemoss has been running, and I was able to get this lovely for $26, and that ain’t a bad deal at all! It was too hard to pass up, and I recommend it, but whatever you do, don’t activate the cloaking device!

Masters of the Universe Origins: Horak and Horde Troopers by Mattel!

It’s been a little too long since I last visited with Mattel’s Masters Origins line, and with how many figures have been added lately, it’s past time that I remedy that. Today, I’m switching my attention to the She-Ra side of things with a look at Hordak and his evil Horde Troopers!

I was never a big fan of the She-Ra cartoon, but when I did watch it, I watched it for The Evil Horde characters. Of particular appeal where the Horde Troopers, which sported a badass design and were pretty damn menacing, at least in appearance. In reality they were just there to give the heroes something without a soul that could get trashed, but I still thought they were damn cool. Anyway, let’s start with Horak himself.

I don’t have a whole lot to say about Hordak, other than Mattel stayed pretty close to the vintage original for this one. He has dark gray arms and legs with black boots and gauntlets. You get a painted silver belt with black furry diaper, and a bulky vest worn over the figure buck with the bright red Horde symbol sculpted on the front. There’s a black armband on his left bicep with a smaller Horde symbol, and two more down on his boots. Finally, he has a red cape, which extends down to about his knees. I really dig the coloring on this figure. The dark black and gray contrasts beautifully with the bright red, and little touch of silver that gives it an extra pop.

The head sculpt is solid enough, but it lacks some of the coloring in the original figure. It still looks fine, but feels a little more basic and a slight step down from the source material. Hordak is still an ugly sunovabitch, with pointed ears, a mohawk-like crest running down to his pig nose, and hideous bumps on his bald head. The coloring on the cheeks sort of resemble facial hair, and he has a single top row of red spiked teeth protruding down into his open maw of a mouth. I think I dig the eyes here the most. They appear to be separate from the head and attached from behind, giving them some cool depth and definition.

Hordak comes with his all white Horde Crossbow, which can be clipped onto either arm. I appreciate the use of a clip here, as his left hand is not designed to hold anything. Like the figure itself, the Crossbow is a pretty solid recreation of the vintage accessory and he looks great holding it. Moving on to the Horde Trooper…

The Horde Trooper was one of my favorite figures in the MOTU Classics line, and it looks like history is repeating itself here. I just dig this design so much. There’s something about mechanized suits of armor that just scratches my itch. Obviously this figure required all new tooling, and the attention to detail in the sculpt is excellent. You get all sorts of vents, mechanisms, and bits and bobs scattered about his armor. The Silver finish looks great, and I like it more than the flat gray used for the Classics version. There’s some black used for the boots, gloves, and joints, as well as bright red for the Horde symbol on the chest, and a yellow round cap in the middle of his groin. I don’t want to know what that’s used for! The only downside here is that the plastic shows off some swirling and a few creases from the molding process, but it’s nothing so bad that it detracts from my enjoyment of what is a great looking figure.

For the head, Mattel stuck with the toy design’s big yellow and black boomerang visor for a face. I’ll confess, I do tend to like the animated head design a bit more, but I’m not hating this. It looks fine, and fans of the original toy will no doubt be pleased. Hey, I wonder what that big red button in his chest is for?

Of course, it’s for the break-apart gimmick, inspired by the original toy design. Give it a press, and the Trooper breaks apart to reveal the red interior with some mechanical doodads sculpted onto it. The play gimmick is pretty well done here, and I find that my Troopers don’t break apart under normal handling, just when the trigger button is pressed.

And finally, the Trooper come with his Force Staff, which is cast all in red plastic. There is some nice sculpting on this piece, but it can be hard to make it out, because of the plastic used. It would have been nice to get a left hand that could hold it too, but I do like him having a fist as well.

And that’s two more excellent figures for the MOTU Origins line. I’m very pleased that Mattel has been dipping into The Evil Horde sooner rather than later, as I think it contains some of the coolest and wildest character designs. The Trooper was surprisingly easy to get a few of, at least initially, and thanks to spreading my pre-orders out, I was able to pick up five with no trouble at all. I do hope we get the Horde Jet Machine at some point, as it would be a great opportunity to bundle another Trooper with, and I’d be down for two or three of those!

Mythic Legions (Soul Spiller): Thallyn Frostbow by The Four Horsemen

Last week, I had to push Mythoss Monday to the end of the week, but now I’m getting back to business as usual, as I dig deep into my dwindling pile of untapped Mythic Legions figures. Today, I’m headed back into the Soul Spiller Wave, one of the smaller assortments, with a look at Thallyn Frostbow!

The Elves were introduced in the mammoth Advent of Decay series, with Thallyn following shortly after. She’s a Frost Elf, which are apparently pretty rare and reclusive in Mythoss, and her mission in life is to warn the world that the Vampyre weapon, Soul Spiller has been retaken. She also happens to have a really kick-ass name too! So far, the Elves have been a welcome addition to Mythic Legions, and I’m excited to check this one out!

In terms of sculpt, I don’t think there’s anything here from the neck down that we haven’t seen before, but that doesn’t stop me from being in awe of this figure! Thallyn is wearing full armor, with a beautiful deco that is certainly becoming of a Frost Elf. The torso, shoulders, lower arms, and lower legs are painted in a pale blue-gray matte, with the rest of the pieces having a pearlescent white finish. And just when I thought it couldn’t get any better, she has some electric blue paint applied some of the accents, as well as the chain mail exposed between the plates. Finally, she has an orange-brown belt, which matches the paint used on some of the tiny sculpted straps for her armor plating. This is a gorgeous suit of armor, and yet another example of how TFH can breathe new life into a sculpt that we’ve seen before, simply by applying just the right combination of colors.

I’m also in love with this portrait! In general, I’ve been a lot more impressed with the Elven head sculpts in this line than I have with the human ones, and Thallyn’s beautiful portrait is a fine example of why. She’s beautiful, but there’s a hint of maturity to this sculpt., which I think comes from the slightly more severe contours of her face. Her white hair is pulled back tightly at the top of her head, and cascades down the back between her pointed ears. She sports a downswept brow, deep blue eyes, and bright red lips, as well as a rosy hue at her cheeks. The paint is neatly applied, it’s a little basic, but it certainly gets the job done just fine.

You also get a second head, which is the same helmeted head sculpt that we’ve seen with some of the previous Elves. It’s beautifully painted to match the armor, and is just the ticket if you want to grab a few more of this figure and give Ms. Frostbow some bodyguards.

And just because Thallyn is a Frost Elf, that doesn’t mean she can walk about the snowy tundras without bundling up. So, to keep her warm, she comes with the wonderful furry pelt that we’ve seen included with a few figures in the past. I really love this garment, as it feels and wears just like real fur. It would have been really cool to get this in white instead of brown, but I’m still happy it was included with the figure. It’s an asymmetrical cut, with no holes for the shoulder pegs, but there are a number of ways to make it work, and I may even wind up punching a hole through it, to make it work with the shoulder armor a bit better. Let’s move on to accessories!

Thallyn doesn’t travel with a traditional sword, but she does come with a stout Dwarven blade. I suppose I’d actually classify this as more of a short sword, because it seems a bit too large to be a knife. The hilt is painted silver and the clipped blade has a pearlescent finish to match parts of her armor.

She also comes with a double-bladed axe, which is smaller and more refined than the one that we’ve seen so many times throughout the waves. This is completely finished in more of that great pearlescent paint, along with some silver applications to the scrollwork on the blades. It’s a beautiful sculpt, and it reminds me of the weapon that came with the Northlord Barbarian from LJN’s old Advanced Dungeons & Dragons line. The axe appears light enough for single-handed use, but the grip is long enough for more powerful two-handed swings.

And finally, as her name suggests, Ms. Frostbow is nimble with a bow, and so we get the standard bow that was introduced with the Elves in the Advent of Decay assortment, as well as a full quiver for her belt, and one loose arrow that she can knock and ready to fire. There’s more of that lovely pearlescent paint for the bow, along with a real string. The quiver is quite striking, as it shares the same orange-brown color as her belt and armor straps, with raised silver scrollwork, and a full inventory of sculpted silver arrows. The quiver clips onto her belt and can be worn on her hip or across her back. As for knocking the arrow, I cheated a bit and used a little dollop of poster putty to make it stay in place!

It has been a while since I last looked an one of the Elves, and Thallyn Frostbow is a most welcome addition to my Legions. The armored Elven body looks simply amazing here in these frosty colors, and she really stands out among the other Elves on my shelves… HA! I love her assortment of weapons, and the fur pelt was a nice addition as well. I’m still hoping that we might get a white one eventually, that I can swap out with this one, but now I’m just looking for things to nitpick! I really wish I had the scratch to pick up at least one more of Thallyn to display with the helmeted head, but the Ice Troll that shipped in this wave sucked up any chance of that, and I have no regrets!

Mythic Legions (Advent of Decay): Wings!!! by The Four Horsemen

As promised, I pushed Mythoss Monday to Friday this week, so I could get on with my infatuation with the Playmobil Enterprise. And while we’re on the subject, that shit took a lot out of me, so I’m sort of phoning it in today. I’m not going to check out a figure today, but rather some accessories. When Advent of Decay came along, TFH released a number of wing sets to customize your figures with, and I’m here to look at ALL OF THEM!!! No, wait. I didn’t mean all of them, I meant two of them, because that’s all I bought.

If you’re looking for fancy wing accessory packaging, look elsewhere! These came in plastic bags with yellow printed labels telling you what they are. And to be honest, these almost got thrown away with the bubblewrap when I got my huge shipment of figures, because I completely forgot I ordered any. The two I’m checking out today are the Black Feather Wings and the Bone Wings. Let’s just go in that order!

I’m using the vampyre Carpathias to model the Black Wings, because he’s a vampyre and they sometimes have wings. Yeah, the feathered wings are a bit of a stretch, but I really didn’t have another figure that I saw as a better fit. Now, if we had some black and purple demon wings, that would be perfect! Still, these don’t look too shabby. I illustrated how the wings worked with the Arethyr Review, but if you missed it, they simply plug into one of the adapter pieces that come with pretty much every figure, and that plugs into the back. Things can get a little more complicated because the size of the slot in the back varies from the first assortment to later ones, but I’m not getting into all that. And yes, you can plug the wings directly into the sockets used for the shoulder armor, and I’ll demonstrate that with the Bone Wings.

The wings attach with hinged pegs, which allow for a lot of posing possibilities coming away from the body, and you also get hinges where they crest, so they can be spread outward. The downside with these are that they’re pretty heavy and the hinged pegs don’t always hold them in place for a long time. Combine that with the way they have a habit of popping out of the sockets, and it can be a lot of trouble to make them stay put. And while I think these do look pretty damn good on Carpathia, I’m not about to display him with them all the time, so maybe I’ll just put them away until a more appropriate figure comes along. Let’s move on to the Bone Wings…

For the Bone Wings, I’m using the Skeleton Soldier, and here I just plugged them directly into the shoulder sockets. The color of the bone isn’t a perfect match for this figure, but it’s close enough that it still looks pretty good. The Bone Wings seem pretty useless, as I can’t see how anyone is going to fly with these, but I do think they look absolutely bitchin;, especially on this figure. Plugging them directly into the shoulder holes gives them a little more stability, and you don’t have the unsightly adapter in the back. But, these wings are also not nearly as heavy and bulky as the feathered wings, so they are all around easier to deal with.

You get the same articulation here as we saw on the Black Wings, and I find these are a bit easier to pose. Unlike the Black Wings on Carpathia, these look ride at home sprouting from this Skellie’s back, and they work really well with any of the regular flavor Skeletons. I may actually keep one of my Skeleton Soldiers equipped with them!

I want to say these were around $15 to 20 per set, but I honestly don’t remember. They’re definitely cool options for display, but I don’t really have any desire to get more. When Mythic Legions drops new assortment of figures, I’m usually trying to squeeze every penny to get as many figures as I can, and buying extra parts like these, just cuts into that figure money. In the end, I’m happy I picked up the Bone Wings, but I could have easily done without the Black Wings.

Star Trek: USS Enterprise (#70548) by Playmobil, Part 2

On Monday, I talked a bit about the unboxing and build of the massive USS Playmoprise, and as promised I’m back today to take a look at the fully assembled toy and some of its play features. So, let’s start with a trip around the ship itself.

Measuring about three feet long from the backs of the nacelles to the forward bow, the Playmoprise rivals even the mighty HasLab Razor Crest in size, but you could argue that the Federation Starship wins the day, depending on how you’re measuring. Either way, I had to shoot this thing on my dining room table using a queen bedsheet for a backdrop. The lighting wasn’t optimal, so I apologize if some of the photos came out a little sketchy. Aesthetically, I think Playmobil did a beautiful job on this beast. The simplistic design of the Constitution Class Enterprise definitely lends itself to Playmobil’s simpler and child-friendly toy designs. As a result, they didn’t sacrifice much in turning the mighty Starship into toy form. The hull features some sparse panel lines and a lot of stickers and tampos to convey all the appropriate details. I suppose you could argue that, given the price tag, some of the stickers could have been sculpted pieces, like the fins on the backs of the nacelles, but the stickers work just fine, and I have no complaints.

For such a large and hefty ship, The Playmoprise sports some excellent structural integrity. I have no qualms about picking it up and wooshing it around the room. The worst that could happen is I hurt my back doing it. But, I wouldn’t pick it up from the warp nacelles, as I doubt those are lode bearing. Still, nothing here feels rickety or tenuous, or something that requires a delicate touch. This is a pretty rugged toy, which probably has a better chance of hurting a child than vice-versa, particularly if it falls on them.

In order to accommodate the bridge playset gimmick, Playmobil had to take some liberties with the proportions of the saucer section, but I think they did a great job minimizing the Primary Hull’s chonks. Most of the added girth is in the bottom portion of the saucer, with the result being a pretty normal looking Enterprise when viewed from most downward angles. You need only look back to Playmates’ Innerspace Enterprise-D to see how this could have gone horribly wrong.

External electronics feature a gorgeous animated spinning effect in the bussard globes at the front of the nacelles, as well as a glow to the globe at the bottom of the saucer. When activated, you get a wonderful audio sequence of the Enterprises’ ambient bridge sounds, starting with William Shatner’s familiar voice saying, “This is Captain Kirk of the Starship Enterprise.” After playing for a while, you will eventually hear a turbolift door open and Spock (voiced by the late Leonard Nimoy) will entreat you to “Live Long and Prosper.”

I mentioned last time that you have two display options: A stand or rigging to hang it from the ceiling. I won’t be hanging mine, but here’s a good look at the stand. The base is a massive gold Delta with a transparent ring. There are four supports that cradle the Playmoprise. Two connect with sockets in the bottom of the Secondary Hull, while the larger ones angle forward to meet rectangular slots in the Primary Hull. It holds the ship perfectly, and the transparent beams keep from obscuring the vessel from any angle. You also get a plate with the Enterprise’s name, class, and shipyard from which it launched in 2245. The name plate does not attach to the stand, so you can place it anywhere you want. I was a wee bit disappointed that it’s only a sticker, considering the cost of this set, but it still looks great. Let’s take take a look at the figures and accessories, before moving to the interior of the ship!

You get a full Playmobil-ified bridge crew, consisting of Kirk, Spock, McCoy, Scotty, Uhura, Sulu, and Chekhov, and they’re all just so goddamned adorable. The uniform details included the Delta insignias, with one of the three department emblems inside, rank stripes on the sleeves, and even some printed stitching around the shoulders. The uniforms look great, and each figure even sports his own unique hair piece, rather than the generic Playmobil coif. Spock has his pointed ears, although I think it’s odd that they gave him a smile. That’s probably just a Playmobil thing. The only real misstep on the figures is found on Uhura, as she looks like she’s wearing a microphone with her earpiece, making me wonder who at Playmobil researched her look. It’s awesome that we got the whole bridge crew, but I really hope we get some figure packs or blind bags with more figures. I really want a Nurse Chapel and Yeoman Rand to add to the crew. Maybe some redshirts too!

As for accessories, Spock comes with a Tricorder, which is just a black box that hangs off his shoulder and McCoy comes with a Hypospray, which looks a lot like a Sonic Screwdriver. Scotty comes with an extra Dilthium Crystal.

Sadly, Sulu DOES NOT come with a rapier, but if you have a lot of Playmobil Pirate sets like I do, that’s easily remedied. But seriously, Playmobil, you couldn’t afford to toss one of these into the box?

The rest of the accessories are rounded out with three phasers and three communicators, and again I’m forced to beg the question… THE MSRP ON THIS SET IS $500 AND YOU COULDN”T GIVE EQUIPMENT TO ALL SEVEN FIGURES? But, with that having been said, these are excellent! The phaser sculpts are spot on, and the communicators actually open and close and have tiny stickers detailing the instruments. Incredible!

And after griping about Playmobil getting stingy with the accessories, I have to applaud them for including a bag of Tribbles. You get seven of these little bastards and they are adorable!!! OK, let’s move inside the ship with a look at Engineering!

There is a removable plate on the Port Side of the Secondary Hull, which reveals Engineering, and this is as cool as it is totally out of scale! There’s room to stand a few figures in there, a couple of computer stations, and the Dilithium Crystal with a second crystal inside it. The backdrop is a lenticular sticker, which gives it a sense of depth when you view it from different perspectives.

Press the button beside the Crystal Chamber and the lights and sound begin to do their thing. One of the consoles light up and the Crystal Chamber lights and begins to pulse. What’s really cool is if you take the Crystal out of the Chamber, the engines will not start! All of the ship’s electronics are powered by three AA batteries housed behind the lit console, but there is also a micro USB charging port on the Starboard side of the ship if you prefer to plug it into a wall socket.

And that brings us to the real show-stopper here. Lift off the top of the Saucer Section and you reveal the bridge! It’s certainly not totally accurate to the bridge seen on the small screen, but it captures all the essentials. You get two seated stations on each side, plus the Helm and Navigation stations in the center, and of course, the Captain’s chair. All of the seats swivel, and the individual chairs can be placed anywhere. I like having the option to move them, but I also would have liked a peg or something to secure them to the deck. The turbolift door is a lenticular sticker, and they will open and close depending on how you view it. Likewise, the viewscreen is also lenticular, showing a Klingon D7 Battlecruiser approaching. There’s also a little compartment in front of the viewscreen where you can stow the accessories. The area is also designed so you can use your phone as a viewscreen. There’s an app you can download for added functionality, but I haven’t tried it yet.

There are three buttons on the central console, which will also activate the light and sound sequence. Pushing the red one will initiate the Red Alert claxon, pressing the blue button will fire torpedoes, and a third press will cause the engines to speed up, making the sound more intense and the bussards will spin faster and faster. The Astrogation console will light up, and there are red lights in the floor that flash for Red Alert, but those aren’t terribly effective.

While the bridge is most certainly scaled down, it still comfortably fits all the figures, and could easily accommodate a few more. There’s some truly great detail in all the console stickers. You can even see the button on Kirk’s chair that he used to jettison the ion pod and kill Lt. Finney in Court Marital.

I don’t think I’m exaggerating when I say, The Playmoprise is easily the greatest TOS toy ever released. It’s gigantic, it looks amazing, and it has plenty of cool play features. And sure, it should have all of these things going for it with an initial MSRP of $499. That price was enough to make even me hesitate. But, this beauty has been going on some deals through Amazon, and I was ultimately able to pick it up for $279 plus a $50 coupon, and the free Prime Shipping helped a lot too. Still, if the price isn’t an issue, finding the place to display it could also be a deal-breaker. With all that having been said, I’m very curious to see what the license extends to, and if we will see any more PlaymoTrek. I think they’d be smart to release a bigger and cheaper bridge playset, plus I’d love to see a Shuttlecraft and the Transporter Room. There are a lot of possibilities, but seeing as how they started with this massive set, I suspect it’s possible that the licensing here was one and done.

Star Trek: USS Enterprise (#70548) by Playmobil, Part 1

If you follow me on Twitter, than you probably know that I have been on a crazy Playmobil kick lately. I’ve reviewed a number of their sets here in the past, but if you want to read about my origins with the toyline, you can check out this post from about 11 years ago! Anyway…. recently I started rebuilding my vintage PlaymoSpace collection and it’s been quite the nostalgic journey that has lead me down a number of different paths. And, yes, I do hope to be checking out some of those vintage sets here in the near future. You may also have seen that I spent my Easter building the massive Playmobil Enterprise, and since it ate up most of my time, I decided to push this week’s Mythoss Monday Review to the end of the week and spend a couple of days checking this beast out. Today I’m going to talk about the packaging and the build process, and on Wednesday I’ll be back to talk some more about the toy itself. You’ll have to excuse the photography here, because these are all just pictures of progress made during the build on my kitchen table. And boy did this operation take up every inch of that table!

This box is huge! It’s probably a tad bit bigger than the box for Hasbro’s HasLab Razor Crest, and that’s saying something! It has a nice, colorful deco, using the classic TOS logo and featuring a picture of Mr. Spock in the upper right hand corner. Lift the front flap and you get more pictures, and a portrait of Kirk. The set is designated #70548 and boasts 148 pieces! The packaging also showcases that the toy features lights and sounds with the help of three AA batteries or a USB power cable. Normally, the box would seem like pretty standard stuff for Playmobil packaging, albeit a lot larger than even their bigger sets, but…

The box has a front flap, and when it is lifted, you are also treated to four windows showing four of the figures, with the remaining three illustrated on the box. At first glance, I thought they were all illustrations, so when I opened this thing up and found a bag with only three figures, I thought I was missing a bag with the rest. I dug through everything several times, until deciding to go ahead with the build and contact Playmobil afterwards. It wasn’t until I finished the entire build that I discovered the little box of four figures attached to the inside of the larger box. Yeah, I felt like a dummy! It’s worth noting here, that the Enterprise isn’t really designed to be taken apart again to go back in the box. You could probably do it with a little care and patience, but I’m still saving the box because it’s so epic.

Inside the box the Enterprise comes in six basic pieces. You get the primary and secondary hulls, a V-shaped piece comprising the nacelle struts, two nacelles, and a top cover for the saucer. Yes, there are tons of more pieces in baggies, as well as a few boxes, but those are the main components of the ship. You also get some bigger pieces that make up the stand, and some wiring and electrical boxes. The instructions rely entirely on pictures, and all in all they are pretty good, but with sets this complex, I think Playmobil should take a page from LEGO’s book and number the bags to correspond with stages of assembly.

Holy shit, look at the scope of this production! Little did I know I would be turning my kitchen into The Utopia Planitia Shipyard for an afternoon! Securing most of the pieces together is done with little red or yellow plastic connection pieces, and there’s a tool provided for those, all of which should be familiar to any Playmobil veterans. But there are a few screws that go into the neck, and you will need a Philips head screwdriver for those. With the exception of threading the wiring, nothing here is any more difficult than any other Playmobil set I’ve assembled, there’s just a lot more of it to do, and some enormous pieces to wrestle with.

There are also lots and lots of stickers. With the exception of the registry number on the saucer and the markings on the sides of the secondary hull, virtually everything here is a sticker! Each half of the bridge’s consoles took sixteen stickers each! You also get some pretty cool lenticular stickers to make up things like the viewscreen, turbolift doors, and the Engineering backdrop. I do have one complaint when it comes to the way the toy is packed, and that’s not having the large pieces wrapped in plastic. There were quite a few scuffs on my ship’s Secondary Hull, which caused me a bit of worry upon first inspecting them. And while I was able to clean them all off with a damp cloth and a little rubbing, you really shouldn’t have to do that with a toy this damned expensive!

The electronics consist of a control box that makes up the middle of the bridge’s deckplate and another that goes into the Engineering section in the Secondary Hull. There are three sets of coiled cables, each with the old style telephone connectors. One of these runs from the bridge box down through the neck into the Engineering box, and the other two run from the Engineering box, up through the nacelle struts, into the nacelles, and ultimately plugging into the bussards on the fronts. I found it helpful to have a pair of tweezers handy in order to reach in and pull the cables through.

You have two options for displaying this beast: One is with the provided stand, and the other is by hanging it from the ceiling. As scary as the ceiling hanging option sounds, Playmobil included a series of clear wires and a Delta-shaped connection piece to facilitate you flying your Starship. They really thought the whole thing out well, with the wires going through lode-bearing parts of the toy, and the instructions include detailed steps on how to make it work. Now with all that having been said, I have no intention of hanging this thing, so it’s the stand for me, and I’ll talk more about that next time.

It took me well over an hour to put this whole thing together, but I was really taking my time and enjoying myself. And I really did enjoy myself! For someone who grew up playing with MEGO’s lamenate cardboard bridge playset, something like this is a dream come true. On Wednesday, I’ll try to get some more polished pictures of this beauty, provided I can find a big enough stage and backdrop to do it with, and we’ll run through the figures and all this amazing toy has to offer!

Transformers Legacy: Blaster & Eject by Hasbro

The hot newness around the Transformers world is the Legacy series, but it really just seems to be a continuation of the previous lines, with a heavy lean in to the old favorite Generation 1 designs and a smattering of Beast Wars here and there. And in keeping with their sometimes irritating habit of recent redos, Hasbro is taking another crack at everyone’s favorite Autobot boombox, Blaster!

I say recent redos, but to be fair we last saw Blaster about five years ago in the Titans Return line, and it was about four years before that when he was released in Generations. Now, I wouldn’t call three Blasters in the course of about a decade overkill, but there are still other characters who are overdue for their time in the spotlight. Now correct me if I’m wrong, but didn’t I see this figure released in Kingdom packaging as well? To be honest, it’s getting hard for me to keep track of some of Hasbro’s releases these days. Anywho, Blaster comes in the colorful new packaging we last saw with Skids, and there’s still a big open window so kids can stick their disgusting little peanut butter fingers all over my toy. Also billed in this package is Eject, which is thankfully a cassette tape and not a Headmaster head, like we got with Twin Cast. Let’s check out the alt modes…

For a long while, Hasbro seemed to be ashamed of the old tape player modes. That was especially the case with Soundwave, but Hasbro seems to have gotten over it, as the last Blaster we got was a boombox, and so is this one. And because we aren’t dealing with any third base mode, this one looks pretty damn good. You get the red body with gray side speakers, a yellow tape door, and a carry bar up top. There are some non-working knobs, and a row of buttons, which can be pressed to open the tape door. There’s not much happening on the flipside, although as you can see, I have a few pieces that aren’t aligned perfectly, which just goes to show this is a fairly forgiving transformation. Colors aside, this looks a lot like the Emerson boombox I used to record songs off the radio with when I was a kid!

The tape deck is pretty small, but I still think it scales pretty well with the Netflix War For Cyberton Soundwave release. A figure, which I never got around to reviewing, but here’s a comparison, nonetheless. Personally, I think they look good together.

As I mentioned earlier, the tape door is spring loaded, and pops open when you press the row of buttons under it. At which point you can pull out Eject in his cassette mode. Eject is mostly cast in this beautiful blue transparent plastic, with some gray parts and gold trim. They didn’t really go overboard with any cassette tape markings, but you can clearly see the two tape reels as part of the sculpt. I wan’t a big fan of the days when Hasbro was turning the cassettes into bombs or data pads, or data discs. It’s nice to see them as cassettes again. The flipside isn’t very polished, and if you’re a goofball like i am and don’t turn the head around, you can see Eject peeking back at you. Let’s check out his robot mode, before getting back to Blaster.

Eject is a pretty cool little guy, and while some may have issue with the use of translucent plastic, I actually like it a lot. It looks gorgeous with the gold paint, and Eject’s proportions aren’t too bad for a little cassette bot. And thanks to some ball joints and rotating hinges, he’s got plenty of articulation too.

Blaster’s transformation is a bit more complex than his old G1 toy, but the principle is pretty much the same. The robot mode is clean and well-proportioned and looks great. You still get the tape door on his chest, the speakers on his lower legs, and I dig the way the carry bar splits and locks into the outside of his legs. Those hollow forearms are a shame, but nothing that’s going to ruin the toy for me, and he even looks surprisingly polished from the back, and includes a whole slew of ports back there so he can store his gun and a bunch of other stuff. They even hit a homerun with the head sculpt here.

Hasbro sculpted Blaster’s right hand so that he has a pointing index finger to allow him to push his own buttons and eject a tape while in robot mode. Seriously, can these guys not just activate eject internally? Why they gotta push their own buttons? Either way, it’s worth mentioning that Blaster has some serious ankle tilts, to keep them feets flat on the floor even in dynamic wide stances, and I sure do appreciate that!

Blaster comes with his very distinctive sniper-rifle style gun. There are plenty of Transformers out there who could get away with any old weapon design, but you can’t mess with this design. It just wouldn’t be Blaster without it!

And if you were playing with Transformers back in the 80’s, you know what a triumph it is to have a Blaster and a Soundwave that actually scale well together. Blaster is just a tad taller than that Netflix Soundwave. Just enough to keep with tradition, but not enough to make it awkward when you want to have them fight. And boy do they look fantastic together!

What’s one of the things that bug me the most about Transformers in the last ten years or so? Hasbro puts out a figure and I really like it. Then four or five years later, they put out a new version and it makes the previous figure, the one I was perfectly happy with, look like poop. That’s probably why my Transformers toys are the only aspect of my collection that I purge with some regularity. There are some older favorites that I keep, but even though the Titans Return Blaster is a distinctive figure with its own charms, now that this new Blaster has come along, I really have no need to keep him in the collection anymore.

Mythic Legions (Advent of Decay): Morgolyth by The Four Horsemen

It’s another Mythoss Monday, and today I’m finishing up with my reviews of Necronominus’ unholy trinity of offspring. We’ve checked out boney brothers, Malleus and Mandibulus, and here comes their skelly sister, Morgolyth!

Morgolyth released as part of Advent of Decay, the second major assortment of Mythic Legions releases. She’s billed as the High Priestess of The Congregation of Necronominus, which sounds damned impressive, even if I’m not entirely sure what it is! She’s also described as being less savage than her brothers, and possessing the ability to see through the eyes of her dead soldiers. I’m assuming that means her undead soldiers, because otherwise it wouldn’t be a terribly useful skill! Either way, let’s open up this package and check her out!

Hot damn, Morgolyth is certainly one of the more distinctive figures I’ve checked out in this line. She utilizes some skeletal limbs that we’ve seen before, mixed with some of the armor bits introduced in Advent of Decay. I don’t recall having seen this torso before, but whatever the case all the components here add up to one amazing looking battle priestess! Her armor is a gorgeous mix of metallic purple and silver, and I absolutely love the design of her chest piece, which evokes a ribcage. The shiny ornate armor contrasts beautifully with her exposed, yellowed bones. A sculpted plastic skirt hangs down dead center and below her belt, while the outfit is punctuated with two scalloped shoulders and a purple cape.

And as great as her armor looks, it’s hard for the eye not to be immediately drawn to her elaborate head dress. This silver ceremonial helmet angles up high above her head and is bisected by her masked face, leaving only the lower half of her boney face exposed. This whole piece is an absolute triumph of sculpt and design, with some beautiful scrollwork etched into it and a hammered finish. It strikes me as an awesome marrying of ancient tribal culture with something vaguely alien. It’s both beautiful and nightmarish, and I absolutely love it.

Morgolyth may be a High Priestess, but she comes packing some serious gear. For starters, she has a standard knightly cruciform sword, here appearing with a gold hilt and a silver blade. You all know by now how much I love this sword, and while it feels a little superfluous here, I’m never going to complain about getting another one! I guess it’s good to have a trusty blade on hand for when Heavensbrand’s do-gooders storm your temple, your skeletal minions are falling all around you, and the proverbial shit has hit the fan.

A little more her style is this elegant hooked dagger and sheath. This accessory was introduced in Advent of Decay and we’ve seen it wielded by both Elves and Vampires alike. It looks great with the hilt and scabbard done up in a metallic purple to match her armor.

Next up is this oversized ceremonial sword, which is quite the flashy piece! It’s got a two-handed grip, a spiked pommel, a crazy-looking guard, and an even crazier shaped blade, which looks like it would be perfect for ceremonial beheadings. Yes, it’s a tad ostentatious for my taste, but it’s an elegant piece and very befitting of our skeletal priestess.

The final accessory is this mystical staff, which wields untold powers. At least those powers are untold in her biography. The gold shaft includes a topper, which is painted in metallic purple and silver to match her armor, because proper accessorizing is important, even for necromancers! I have been swapping out between this and the big sword for her primary display weapon. They both look great!

I know I say this a lot, but Morgolyth may be one of my new favorite figures in this line! Yes, I’m partial to the skeletons, and while I love me some tried and true boney warriors, it’s cool to have a High Priestess around to hold some unholy rituals, raise more ranks from the dead, and do some dark spell-slinging. But even laying all that aside, this is just one drop-dead gorgeous figure. From the beautiful design of her armor and headdress to the wonderfully snappy colors, Morgolyth is quite simply a showpiece for the collection.

Star Wars “The Mandalorian:” AT-ST Raider (#75254) by LEGO

It’s hard to believe it, but it’s been more than five years since I last built and reviewed a LEGO set here on FFZ. And while LEGO has been out of the picture here, that doesn’t mean I haven’t been picking up the odd set here and there over those years. And having recently moved, I’ve unearthed some of those sets from storage and decided that it was time to build some of them and check them out. So, let’s have a look at the AT-ST Raider from The Mandalorian!

Full disclosure: The main reason I bought this set was because it turned up on clearance and I just couldn’t resist it. I would have much rather picked up the Hoth AT-ST that’s still on the shelves now, but I’m just a sucker for discount LEGO, and it is still an AT-ST. This one is based off Chapter 4 from the first season, titled Sanctuary. I wouldn’t say that I actually disliked any episode of The Mandalorian yet, but Sanctuary was probably my least favorite. It was just really cliched, but at least it had an AT-ST going for it. Anyway, this set consists of 540 pieces, spread out over four numbered bags, which build the AT-ST itself and four Mini-figs! It’s been a while, so let me see if I remember how to do this… oh, yeah… LET’S START WITH THE MINI-FIGS!!!

You get two heroes and two villains, which would make this a well-balanced battle in a box if it weren’t for the giant AT-ST. The heroes consist of The Mandalorian himself and Cara Dune, both of which were good incentive for me to pick up this set. They both look great, and don’t involve any surprise pieces. Mando has a cape, but does not have a printed face under that helmet, just a black head slug. The printing on both figures costumes is nice, and I like Cara’s smirk, while she also has a bit of a snarl as her other face. Cara’s rifle is great, but I’m not as impressed with Mando’s. I guess this is supposed to be his disintegration rifle, with the claw serving as the tuning-fork style barrel, but that’s a bit of a reach. But, even with that nitpick, I love these figs!

For the villains, you get a pair of Klatooinian Raiders, and these guys are pretty damn cool too. Their legs feature the same printing for both, but their torsos are each unique. One has a helmet and a road-warrior style piece of spiked shoulder armor, while the other one just has this weird neck piece. You get an impressive rifle and two pistols for these guys. But do you really need guns, when you have this…

This is my first time building a LEGO AT-ST, so I can’t speak to whether or not this is the same build as the Hoth one, but it is a very impressive model. The scale on the AT-ST feels just right, as it could easily step on a Mini-fig if they get underfoot. The build was pretty fun, with the only redundancy being in the legs, and the model mixes things up a little bit with different colored bricks to show the custom work done on this beast. You also get some exposed cables for the left leg, which is a great little touch.

The legs are a fairly technical build, and the design kept me interested in exactly what they were doing with all the support pieces. It is, however, a little deceptive, as during the build, I believed that I was creating a lot of articulated joints, when in reality the only articulation in the legs is in the “knees” up near the top. I though that would be disappointing, but it’s really not, as I appreciate the stability of this model. It stands rock solid, and I doubt that would have been the case with a lot of working joints in the legs. And I’ll throw it out there again, how much I dig the custom color pieces, which are also helped along by some well-placed stickers.

One of the biggest surprises of this build was the way the body goes together. It isn’t a solid box, but rather the sides just kind of hang on the front and back pieces. This means there are notable gaps where these connect, which become very obvious when looking inside the cabin, but is also pretty apparent from the outside too. It doesn’t deter my enjoyment of the model at all, but it’s an interesting design choice, nonetheless. There is an action gimmick with a knob on the back of platform that can be used to rotate the head left and right. The weapons are also all articulated, so you can swivel the cheek guns, raise and lower the chin guns, and there are two flick-fire missiles hidden on each side of the chin guns.

Like the old Kenner toy, the entire top of the body lifts up to give you access to the cabin, but there’s also a hatch that can be opened as well. There’s actually room inside for both Mini-figs, even though in the episode, the AT-ST was some kind of robotic drone. I like that there are hand rails on each side of the hatch, so you can snap a Mini-figs hand onto it and it will hold him in place popping his head through the hatch. The window armor plates are also articulated, and can angle up or down.

This was a great set to come back to after being away from LEGO for so long. I’d say it took me about an hour or so to build, but I was having some drinks and taking my time. The instructions were well illustrated, and I was able to get through it without making any stupid mistakes or swearing up and down that I got shorted a piece, only to find it a minute later. Yeah, that happens to me a lot! I don’t remember what this sold for originally, but $22 was the magic number that got me to take it home, and I’m very glad I did. It’s a fun build, has some solid Mini-figs, and the AT-ST is a great model with plenty of play potential.

Marvel Legends (Colossus Wave): Iceman and Legion by Hasbro

I’m continuing to cut a swath through the endless backlog of Marvel Legends figures that are piled up around here, and I’m more than halfway through the Age of Apocalypse-inspired Colossus Wave. I’m tackling this wave in pairs, so I can get through it a bit faster, and that brings us to Iceman and Legion!

I didn’t really pair these together for any reason, other than I had four figures left, and it seemed like I should do Shadowcat and Colossus together. Or, you could say that I was going for a blue theme today. The fact is, I came into these two figures with very different expectations. One I was pretty excited for, and the other… well let’s check that one out first.

Yup, Iceman was the figure that I was least excited about in this assortment. No offense to Bobby Drake, but I just didn’t think that it could possibly be all that drastically different than the last one we got from the Juggernaut Wave. But when I got this guy in hand, I quickly changed my tune. Maybe I was just expecting a quick rehash of the previous release, but this is anything but that. Yes, a lot of the sculpt appears to be recycled, but Hasbro cast off the smooshy and chalky white plastic for this vibrant translucent blue that is absolutely gorgeous and does a great job replicating an ice effect, especially with the white dusting around the chest and shoulders.

The portrait is all new, including a new collar of jagged ice. The facial features are a bit amorphous, but he has clearly defined white eyes, and more jagged ice-spikes in place of his coif of hair. I dig the look here a lot, as it leans into a harder Bobby from his severe environment.

There are no surprises in the articulation, although he does lack the swivels in the lower legs that we often see in the modern Legends line. I would have liked to see the shoulder crunches here, but that might have been a bit too ambitious for the translucent plastic. Whatever the case, he’s fun to pose, especially without the soft hinges I had in my previous Bobby Drake figure.

Iceman doesn’t come with much in the way of accessories, although you do get a pair of enlarged ice claws, which are pretty cool additions to a beautiful figure. Let’s move on to Legion…

I was profoundly disappointed that Legion wasn’t included in the first Age of Apocalypse Wave, considering he is the reason for the season so to speak. But patience prevailed and all was forgiven when he turned up in this second assortment. X-Men certainly has its share of memorable and sympathetic characters, but I developed a particular connection with Legion over the years. I was particularly struck by the way Bill Sienkiewicz portrayed him in the panels, and later having a friend develop Schizophrenia helped to hammer home the heartbreak I would eventually associate with David. Hasbro did some inspired parts recycling here by borrowing the legs and bare feet from Shang-Chi. I wouldn’t have guessed that would work as well as it did. I really dig the blue they used for his outfit, and the extra shading really makes the figure pop.

I do like this head sculpt a lot. Yes, it’s pretty tame in some respects, but there was no way Hasbro could have recreated some of the more memorable and trippy depictions we’ve seen in the comic panels. The unmistakable stack of hair looks great, and I dig that they added that one little cowlick jutting out of the front. The smirk and the squint work for me, although the eyes could have been painted a bit sharper.

The articulation here is identical to what we just saw with Iceman, and that includes the omission of swivels in the lower legs. Legion also comes with two pairs of hands: One pair relaxed and one pair balled up into fists. I wouldn’t have considered that necessary, but it’s always nice to have options!

What a great pair of figures! Iceman just all out surprised me! It’s not that the regular Iceman release was a bad figure, but I just appreciate how Hasbro went all out to make this one so distinctive. As for Legion, I’ve been looking forward to getting him on the shelf for a while now and he definitely lived up to my expectations. On the whole, this has been a really solid assortment of well-executed characters, and I’m looking forward to checking out the last two next week with Shadowcat and the Colossus Build-A-Figure!